
How to Make Your Cold Plunge a Welcoming Wellness Space
A cold plunge can be more than a functional tub tucked out of sight. With thoughtful placement and a style that suits its surroundings, it can become the focal point of a welcoming wellness space. Learning how to make your cold plunge an aesthetic centerpiece starts with balancing visual appeal and everyday practicality.
It’s natural to want a calm, intentional space, not a collection of equipment. The best setup brings the plunge into harmony with its setting while keeping your routine comfortable and easy.
This guide will help you choose an indoor or outdoor location, select an above-ground tub style that fits your design, and plan a backyard wellness center around the plunge. You’ll also find ways to bring the elements together with considered layout, materials, and finishing touches, so the space feels cohesive as well as functional.
Key Takeaways
- Choose an indoor or outdoor location by balancing ventilation, access, and how the plunge fits into its surroundings.
- Match an above-ground tub’s footprint and visual style to the space so it feels intentional, not like an afterthought.
- Plan a backyard wellness area as a cohesive layout, with the plunge positioned in relation to features such as a sauna or outdoor shower.
- Shape your budget around the tub, materials, finishes, and installation scope without relying on a one-size-fits-all estimate.
- Use lighting, landscaping, privacy, and durable finishes to create an inviting setting that still works for everyday use.
Choosing an indoor or outdoor plunge location
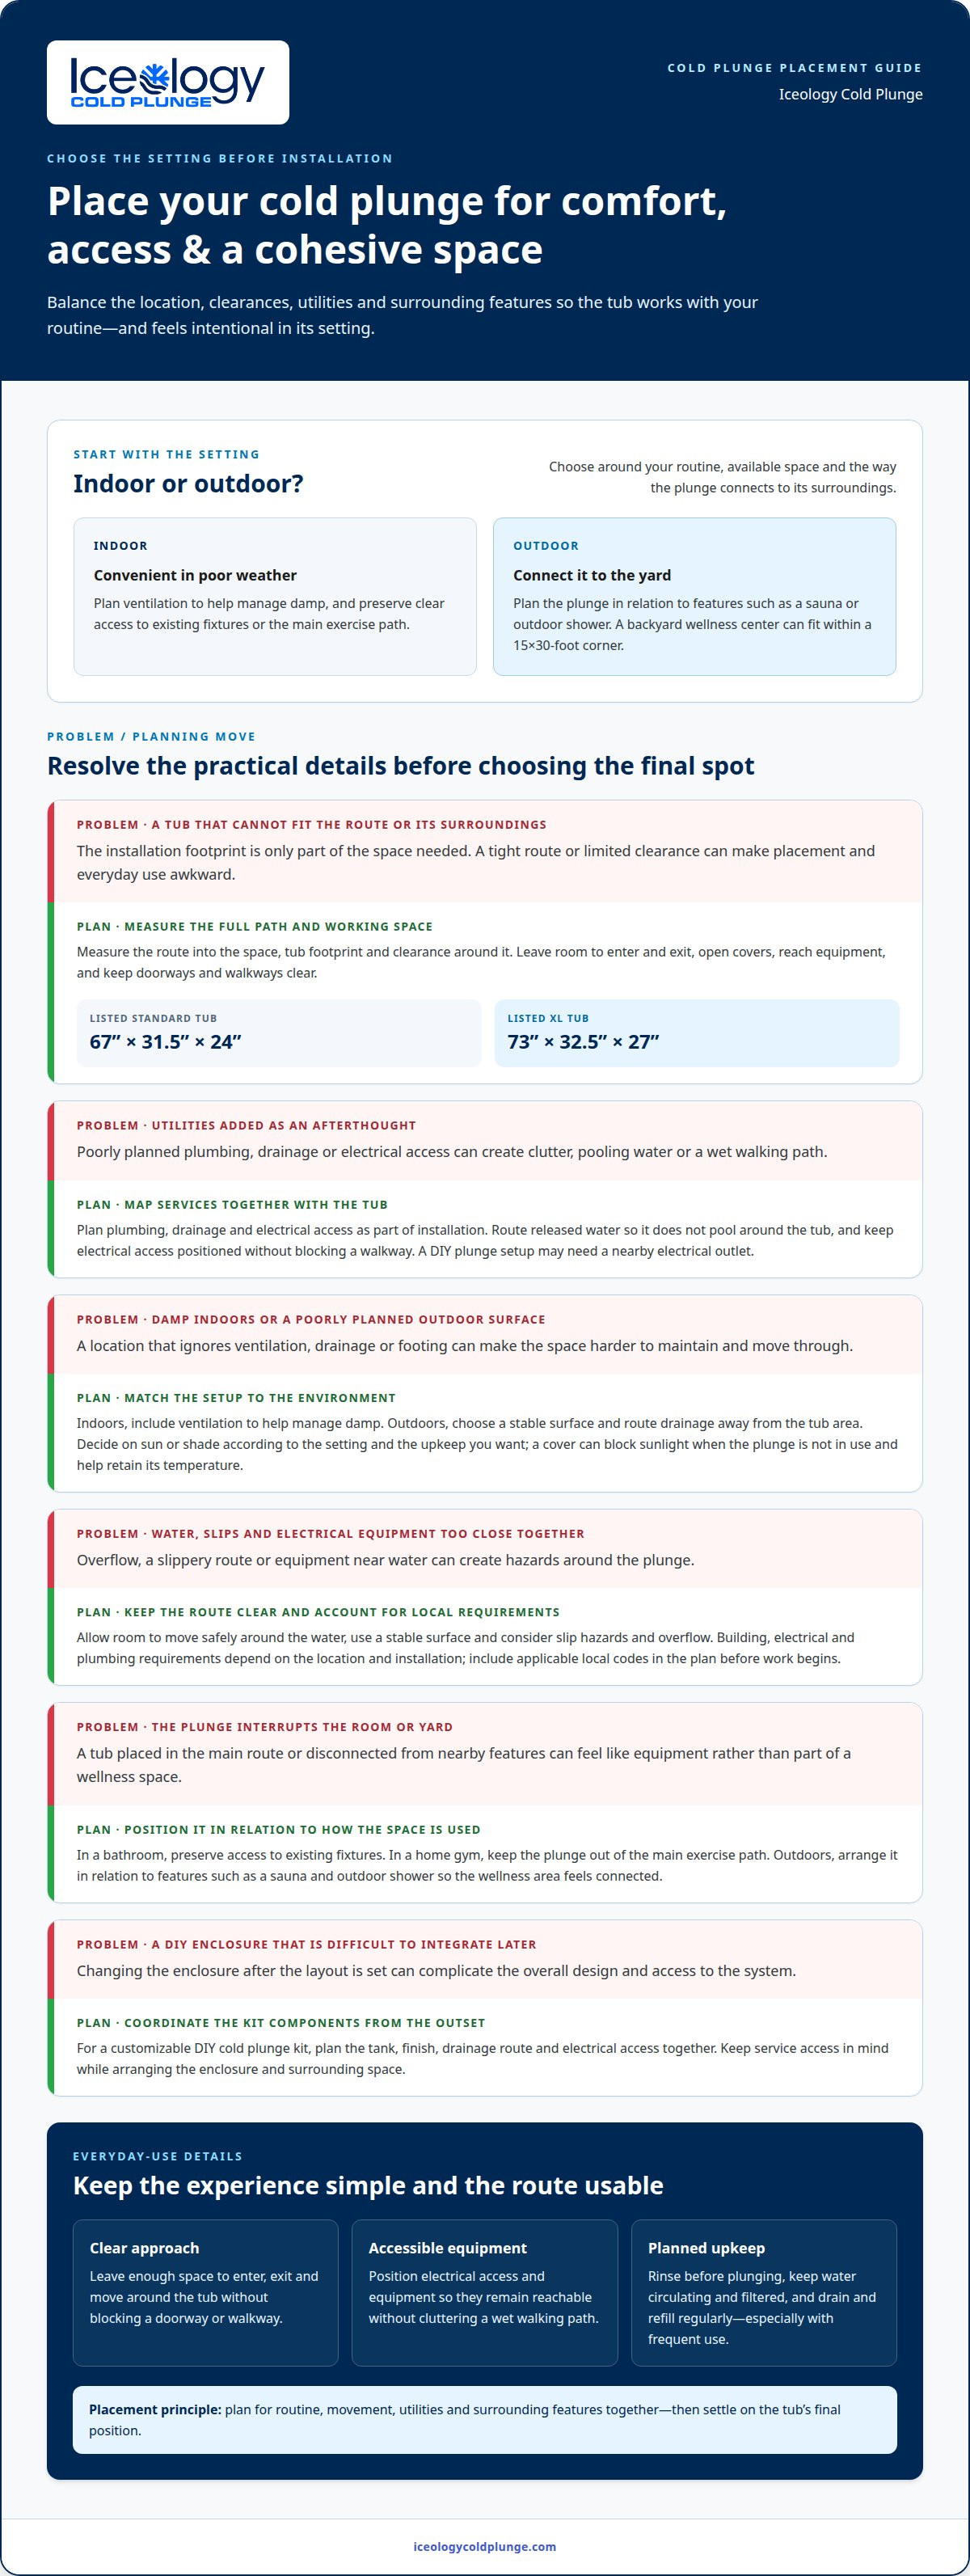
- Start by matching the plunge to your routine and the room available. An indoor location can make access convenient during poor weather, but it needs ventilation to help prevent damp. Outdoors, consider how the tub connects with the rest of the yard. A backyard wellness center can work within a 15×30-foot corner, with space planned for movement and adjacent features.
- Measure the route into the space, the installation footprint, and the clearance around the tub before settling on a location. A listed standard tub measures 67” x 31.5” x 24”, while a listed XL tub measures 73” x 32.5” x 27”. Include room to enter and exit comfortably, open covers, and reach any equipment without blocking a doorway or walkway.
- Plan plumbing, drainage, electrical access, and ventilation as part of installation. Route drainage so released water doesn’t pool around the tub, and position electrical access for the system without creating a cluttered or wet walking path. A DIY plunge setup may need a nearby electrical outlet. Indoors, include ventilation to help manage damp; exact installation needs depend on the tub and space.
- Account for slip hazards, water overflow, and electrical equipment near water before choosing the final position. Building, electrical, and plumbing requirements depend on the location and installation, so include applicable local codes in the plan before work begins. Keep the route to the tub clear, choose a stable surface, and leave enough room to move safely around the water.
- Integrate the tub into a bathroom, spa, or home gym by treating it as one part of the room’s layout. In a bathroom, preserve clear access to existing fixtures; in a home gym, keep the plunge out of the main exercise path. Outdoors, position it in relation to features such as a sauna and outdoor shower so the wellness area feels connected.
- Choose sun or shade according to the setting and the upkeep you want. A covered plunge can block sunlight when it’s not in use and help retain its temperature. For a customizable DIY cold plunge kit, plan the tank, finish, drainage route, and electrical access together; changing the enclosure later can complicate a cohesive layout. Rinse before plunging, keep water circulating and filtered, and drain and refill it regularly, especially with frequent use. These steps help limit dirt, oils, odors, algae, and visible wear.
Above-ground tubs and their design styles
- Choose a silhouette that suits the room’s architecture. A rounded tub softens a bathroom with square tile, while a rectangular form echoes straight-lined cabinetry or a modern deck. Keep its outline consistent with nearby fixtures. A useful way to think about how to make your cold plunge an aesthetic centerpiece is to let the tub’s shape reinforce the space’s existing lines.
- Use the tub’s exterior as a design surface. A wood-look surround brings warmth to a neutral patio, while a smooth, dark finish contrasts with pale stone. Indoors, coordinate the outer finish with existing tile or wood tones. Keep the palette focused, using one dominant material and a complementary accent.
- Plan how visible equipment affects the overall design. Chillers, hoses, and access panels can interrupt a clean profile if they face the main seating area. Position the tub so its most finished side faces the room or garden, while preserving access to service points. A slatted screen or planted border can soften the view without enclosing the chiller. If placed outdoors, protect it from weather and the elements.
- Balance the tub’s scale against nearby elements. A compact model can sit beside a bench or towel shelf without overwhelming a small home gym. A larger tub may need a stronger visual anchor, such as a tiled wall or timber platform. Leave open space around either shape; crowding it with décor can make the arrangement feel less composed.
- Coordinate the entry with the chosen style. A low-profile step in a matching finish can make access feel integrated, while a folded towel and simple hook near a shower add function. Keep accessories grouped on one tray or shelf. These details help answer how to make your cold plunge an aesthetic centerpiece while keeping its surroundings practical.
- Finish the scene with lighting and a restrained accent. Warm light can bring out wood grain, while indirect lighting can emphasize a dark tub without glare. Repeat one material or color in a nearby stool, planter, or towel to connect the pieces. For a cohesive focal point, explore a considered plunge design that complements your space.
A cold plunge pool is a small, chilled pool designed for brief immersions in water typically at 39-60°F. Let that compact purpose guide the surrounding design: keep the tub easy to approach, and avoid making its entry feel like a separate, elaborate feature. A clear path and a nearby place for a towel can make the area feel intentional while leaving the pool itself as the focal point. If the tub sits outdoors, choose accents that belong with the garden as well as the home; indoors, let the finish relate to the room’s existing materials. In either setting, keep the presentation simple enough that the tub’s shape remains easy to read.
James and his wife had been taking cold showers for several weeks before building their cold plunge. For a space used as part of a regular routine, favor a design that feels welcoming and straightforward rather than purely decorative. A small landing area for personal items, a seat within reach, or a discreet screen can support comfort without competing with the tub. Consider how the scene looks from the doorway and from the place where someone pauses before entering. A composed view, a practical route, and restrained accessories can make the plunge feel integrated into the room or garden.
How much do stylish cold plunge tubs and custom installations cost?
- Define the project before comparing estimates. Separate the tub, temperature-control equipment, delivery, site preparation, installation, and finish work into distinct categories. A freestanding plunge in an existing space has a different scope from a built-in basin with a tiled surround. This breakdown shows which design decisions affect the project and helps prevent decorative upgrades from obscuring essential equipment.
- Choose the installation approach next. A ready-to-use tub can limit custom construction, while a built-in design may involve framing, waterproofing, and finish work. A custom setup shifts more planning and labor to the owner, including coordination of the tank, water system, and surrounding structure. The right route depends on the desired appearance, available skills, and complexity of the site.
- Account for the site itself. An indoor installation may require changes to drainage, ventilation, or electrical access; an outdoor location may need a prepared base and a practical route for water. Existing utilities and surfaces influence the work involved. List these conditions before selecting finishes, since a polished exterior cannot make up for an installation plan that overlooks functional access.
- Set the visual scope with specific materials. A simple wood surround, a stone-style exterior, and a tiled built-in each create different project requirements. Compare the finish area, edge details, access panels, and any platform or step as separate choices. For instance, limiting tile to a feature wall instead of covering the entire enclosure can preserve a designed look while changing the amount of finish work.
- Include operating equipment in the budget plan, not just the visible tub. A built-in chiller, circulation and filtration components, and their connections all take up space and need access. Ask for estimates that distinguish equipment from labor and finish work. This makes it easier to understand whether a design change affects the tub, its surroundings, or installation coordination.
- Protect the budget with a written scope and a clear priority order. Mark essential items first, such as the basin, water system, and functional connections. Then rank optional choices, such as upgraded cladding, custom lighting, or decorative screening. If a DIY build changes during construction, record each revision and its effect on materials or labor. A defined scope keeps style decisions deliberate.
What materials and finishes are best for a built-in or custom cold plunge?
- Choose materials by separating the water-holding basin from its decorative surround. The basin needs a waterproof interior; the exterior can carry the room’s visual style. For example, pair a simple basin with a timber enclosure, or coordinate a tiled surround with existing bathroom finishes. This distinction helps keep design choices focused without confusing decorative cladding with the structure containing water.
- Plan the basin’s waterproofing before selecting colors or trim. Aquarium-safe silicone or pond-safe resin can be used to waterproof a custom plunge tub. Apply the material to the appropriate interior surfaces and joints, following its product directions. A clean, continuous finish also makes the inside look considered, rather than like a container hidden beneath decorative panels.
- For a wood enclosure, decide how the boards will frame the tub and where access panels belong. One 300-gallon custom build used pressure-treated wood throughout; its builder chose 2x6 lumber instead of 2x4 lumber for the vertical pieces. That example shows how the structure can be designed as part of the visible form, rather than treated as an afterthought.
- Use a restrained palette to connect the plunge with nearby surfaces. A natural wood exterior can complement a stone patio, while a tile surround can echo a bathroom wall. Keep the basin edge visually simple, then repeat one finish in a nearby bench or shelf. Repeating a material creates cohesion without adding competing patterns around the water.
- Resolve edges, seams, and equipment access before completing the finish. A neat cap along the rim can create a clean transition between basin and surround. Place removable panels where plumbing or water-system components need access, and avoid sealing those areas behind permanent trim. These practical details keep the composition tidy while preserving access for maintenance.
- Choose surfaces with upkeep in mind, not appearance alone. Smooth interior finishes are easier to wipe than textured joints that collect residue; uncluttered exterior panels also simplify routine cleaning. Keep wood and other decorative materials outside the water-holding area unless they’re intended for that use. For a cohesive result, coordinate the finish, rim, step, and nearby storage before construction starts.
James built the 300-gallon tub using pressure-treated wood throughout rather than only at the base. That choice offers a useful design example: the visible structure can be planned as a continuous part of the plunge, not just as support for the basin. If you want a wood-forward look, decide whether the same material should carry across the enclosure, framing, and other visible details. A consistent approach can make the tub read as a designed feature while keeping the water-holding basin visually distinct.
Think through how your choice will meet the finish around the tub. Keep the wood treatment and the basin’s waterproof interior as separate decisions, and plan the rim and access panels to fit the overall composition. The exterior can remain simple or connect visually with nearby wood elements. Whichever direction you choose, settle the layout before adding decorative trim. This keeps the structure’s role clear, gives the finish a deliberate appearance, and avoids relying on cladding to disguise an unresolved basin or access detail. A full-wood approach is one option to consider as part of the design from the outset.
How to design lighting, landscaping, and privacy around an outdoor cold plunge?
- Map the outdoor scene from the house before placing lights. Mark the tub, path, seating, and any sauna on a simple yard sketch. This reveals where illumination needs to guide movement and where it should highlight the setting. For example, a low light near a stepping-stone path can define the route without making the tub area feel exposed.
- Layer lighting by purpose instead of relying on one bright fixture. Use a path light to show the approach, then softer indirect light near a fence or planter. Aim fixtures away from the water’s surface to avoid harsh reflections. A warm glow on a timber screen can also make the plunge area feel connected to the home after sunset.
- Keep the tub’s entry and surrounding surfaces easy to see at night. Place lighting where it reveals steps, edges, and changes in paving, rather than shining directly into someone’s eyes. A wall-mounted fixture near the access side can complement softer landscape lights. Keep cords and equipment out of the walking route to preserve a clear approach.
- Use planting to soften hard edges and define zones. Ornamental grasses beside a deck can provide a gentle screen, while a row of planters can mark the boundary between the plunge and a garden path. Choose plant shapes that suit the setting, and leave access to the tub and its equipment. Avoid placing dense foliage where it obstructs movement.
- Build privacy around sightlines, not by enclosing the whole yard. Stand at nearby windows, the patio, and the main approach to identify exposed views. A slatted screen can block a direct view while keeping the space open; a tall planter can soften a lower sightline. Position each feature to shield the tub without closing off the route.
- Coordinate screening materials with the tub surround and nearby architecture. Repeat the same wood tone in a bench or fence panel, or echo the patio stone in a planter edge. This creates a deliberate visual link between the plunge and its surroundings. Keep the palette restrained, so greenery and water remain the focal points.
- Finish the layout with practical details that keep the outdoor retreat composed. Store towels in a covered box near the entry, and leave a clear place for used items. Keep lighting controls accessible from the path, and position planters away from drainage routes. These small choices help the area stay orderly through regular use.
Iceology Cold Plunge
Iceology Cold Plunge can help you bring your wellness-space plans together with a cold plunge designed for regular use. Its tubs are made in the USA and feature built-in chillers that can lower water temperature to as low as 39 °F. That integrated design gives you a functional foundation as you coordinate placement, finishes, and surrounding details.
Consider Iceology Cold Plunge when you’re choosing a tub to suit an indoor or outdoor setting, or pairing it with accessories for your setup. The right starting point is a space and style that support your routine without crowding the room or yard.
Make Your Wellness Space Your Own
Make the space feel like a natural part of your daily routine. Choose details that reflect how you want to use it, whether that means a quiet reset outdoors or a focused pause at home. That personal intention makes the design welcoming, not simply decorative. As you decide how to make your cold plunge an aesthetic centerpiece, let comfort and visual character work together.
Iceology Cold Plunge offers Cold Plunge Tubs, Accessories, and Ice Baths to support different approaches to cold-water wellness. Consider which setup best fits your space and the routine you want to build, then let that choice guide the finishing touches.
A thoughtfully shaped wellness space can make room for a steadier, more intentional ritual. Start with the setting that feels right for you.
Frequently Asked Questions
What design styles make a cold plunge look like an aesthetic centerpiece?
A modern spa style, a rustic retreat, or a clean industrial look can each make a plunge feel intentional. Choose one direction, then repeat its visual cues: a simple geometric profile for modern spaces, natural textures for a retreat, or restrained metal details for an industrial setting. Keep storage and accessories visually coordinated, so practical items support the design instead of competing with the tub.
How do I choose a cold plunge tub that complements indoor or outdoor decor?
Start with the room or yard’s strongest design feature, such as a dark window frame, patterned floor, or structured garden bed. Choose a tub shape and exterior finish that relate to that feature without matching every detail. For example, a rounded tub can soften a room dominated by straight lines. Consider the tub’s visual weight, too, and leave nearby surfaces uncluttered to keep the overall arrangement balanced.